
Let’s set up that new FortiGate!
Seemed like a good idea to do an updated version of a post we did a while back. The FortiGates are a very popular firewall line, and the desktop models find their way into the hands of a lot of people who work in small organizations that don’t have IT guys handy to take care of this for them. Now, Fortinet (like pretty much every firewall vendor) positions its’ solutions as being easy to deploy. But it doesn’t hurt to have a little assistance. After all, it’s not like plugging in a toaster.
Don’t worry about model, these steps apply to pretty much any FortiGate. First, check the little Status light on the front and make sure it’s solid, then plug your ISP modem to LAN 1. Also, connect your PC to one of the numbered ports. They will be on the right side of the front of the firewall.
If your FortiGate has a MGMT port, connect the PC to it instead.
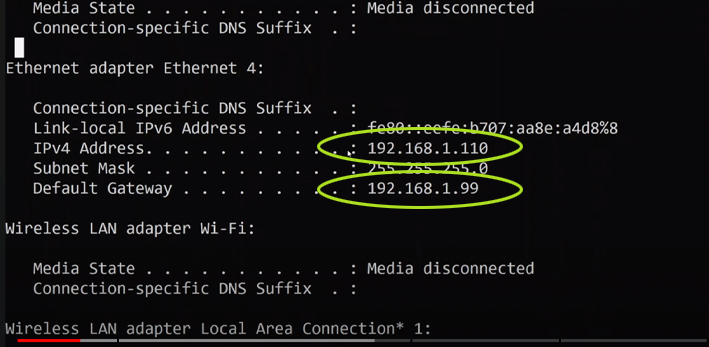
Note the IPv4 address that your PC is given, and the Default Gateway beneath it (192.168.1.99/24 is the default IP address for all new FortiGates). Select and copy that number. Then, once in the Fortinet login page, type “admin” in to the User Name (no password), and then you’ll go to the Change Password page. It is here that you will select a password.
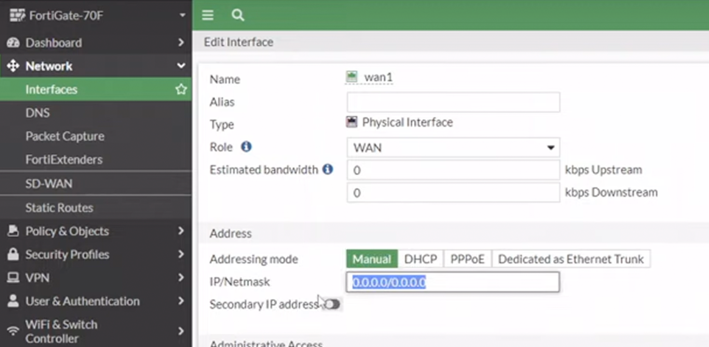
You will be taken to the main dashboard of the firewall itself. At left, click Network > Interfaces, then select wan1 on the left side. You will want to manually enter a static IP address, then click OK.
Next, select Static Routes on the left side. You’re going to set up a static route. Click “New” up top, “New Static Route” should pop up. Click in the Interface window and select wan1. In the Gateway Address window, enter your ISP modem’s IP address.
By the way, on a Windows PC:
Here’s how you find your ISP modem’s (router’s) IP address:
- Use the Command Prompt application to find a router’s IP address on a Windows computer1. It’s a CLI application.
- Search “cmd” to open Command Prompt, or right-click the Start button and select Command Prompt.
- Type “ipconfig” into Command Prompt and hit Return.
- If you connect to the internet wirelessly (the most common method), you’ll find the router IP address in the section “Wireless LAN Adapter Wi-Fi.” If you’re connected via Ethernet cable, look for the section “Ethernet Adapter Ethernet.”
- The router’s IP address displays beside the words “Default Gateway.”
Now, go to Network > Interfaces again, and move down the page to check out the LAN settings. You should see your PC connected to one of the 5 numbered ports mentioned earlier. Clicking in that light gray area takes you to the interface settings, where you can reassign, edit, fold, spindle, or mutilate the ports on your firewall to your heart’s content. For example, you will see ‘internal 1-5 ports at the top of this page. You can reassign one of the physical ports (1-5) so it isn’t on the VLAN (virtual network); now it shows up in the ‘Physical Interface” section, but not in the VLAN Switch section. You can now use that port for something else.
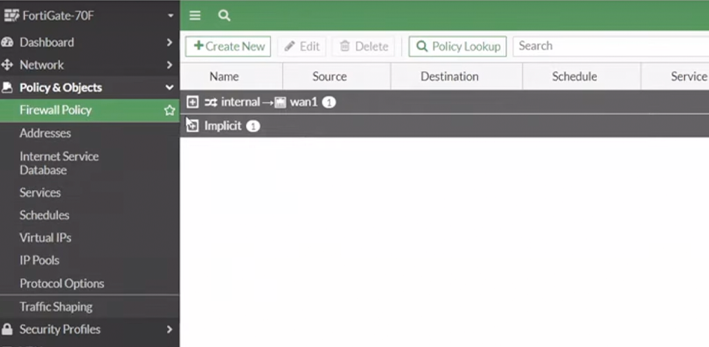
Now to create a firewall policy. On the menu at the left of the page, select Policies and Objects > Firewall Policy. You’re going to allow devices plugged in to the 1-5 numbered Virtual LAN ports to access the Internet via the wan1 (physical) port. When clicking on Firewall Policy, you should ac actually see a policy. Click the policy, then name it whatever, and make the adjustments you want.
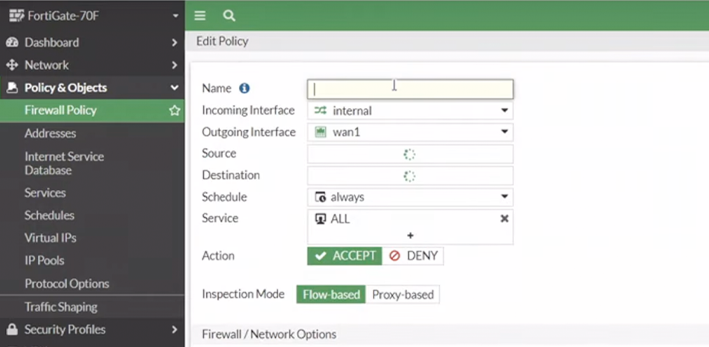
Scroll down and make sure the Policy is enabled, then check to see that you can access the Internet from that PC.
Be sure to go to support.fortinet.com to register all serial #’s, Service Contract Reg #’s, License Certificate #’s, and so on.
If you go to the left side menu of the FortiGate portal again, and click System > FortiGuard and click on Update Licenses and Definitions Now at the upper right to go ahead and receive those services and features. Your server might take a little time to recognize this, so don’t be alarmed. Once done, all your nifty firewall services will appear under Entitlement at left.
At this point, you can head back to Policy and Objects to view the new features, and activate the Entitlements you want. You should have a functioning firewall now. If you have any questions or issues, please email us or call Corporate Armor at 877-449-0458. We’d love to help. Thanks for reading!