

We are going to try to provide a simple step-by-step on how to make your shiny, new, just-out-of-the-box FortiGate firewall do firewall things like it’s supposed to. This is not a super-short process, but it isn’t complex, either (with thanks to our great partner, Fortinet!).
BUT, it should be noted that most of the FortiGate desktop models have a default configuration that includes a DHCP server on the LAN (or internal) interface and a security policy that securely allows all sessions from the internal network to reach the Internet. Because of this, you can connect your desktop FortiGate to the Internet in two simple steps:
(Oh, by the way #1:) In order to use this installation method, your ISP must provide connectivity with DHCP without authentication. You must also use IPv4 to connect your FortiGate to the Internet.)
Here’s how you do it:
First, connect the WAN interface on your FortiGate (that’s the holes on the front of the firewall) to your ISP-supplied equipment (that’s your router), and connect the internal network (like your home computer) to the default LAN interface on your FortiGate. Turn on the ISP’s equipment, the FortiGate, and the computers on the internal network.
Second, for computers on the internal network:
Windows Vista/7/8/10 users:
• In Network and Sharing Center, select Change Adapter Settings.
• Open the Local Area Connection (Ethernet or WiFi) and select Properties.
• Select Internet Protocol Version 4 (TCP/IPv4) and then select Properties.
• Select Obtain an IP Address Automatically and Obtain DNS Server Address Automatically.
• Click OK.
Mac OS X users:
• Go to System Preferences > Network and select your Ethernet connection.
• Set Configure IPv4 to Using DHCP.
Results
To confirm successful Internet connectivity from any computer on the internal network, open a web browser and browse to any website.
Now then, for the rest of you, we have:
Installing a FortiGate in NAT mode
For our purposes, we’ll connect / configure a new FortiGate in NAT mode. It’s the most common method. This will securely connect a private network to the Internet.
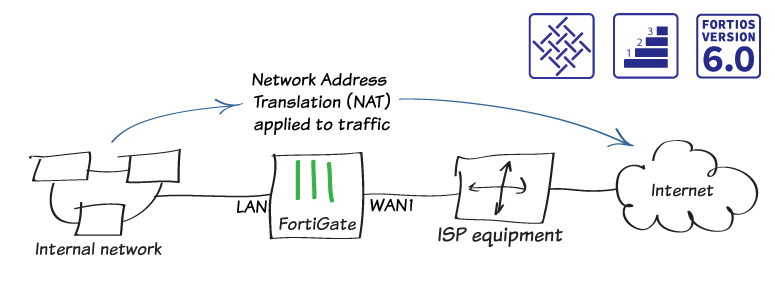
Basically, in NAT mode, you install a FortiGate as a gateway, or router, between two networks. Usually, this will be between a private network and the Internet. This allows the FortiGate to hide the IP addresses of the private network using NAT. (In case you’re wondering, By the way, Network Address Translation (NAT) is the ability of a router to translate a public IP address to a private IP address and vice versa. It adds security to the network by keeping the private IP addresses hidden from the outside world.)
Connecting network devices
• Connect the FortiGate to your ISP-supplied equipment using the Internet-facing interface. This is typically WAN or WAN1, depending on your model.
• Connect a PC to the FortiGate, using an internal port (in the example, port 3).
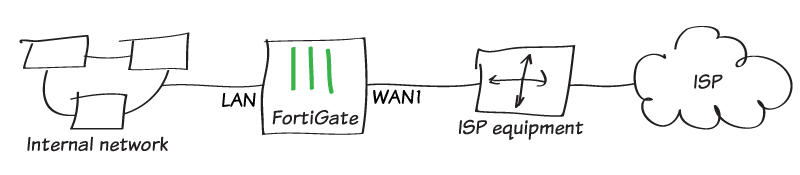
• Power on the ISP equipment, the FortiGate, and the PC on the internal network.
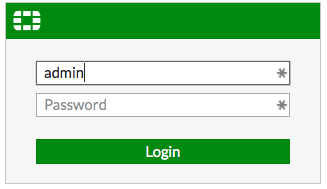
• Use the PC to connect to the FortiGate GUI using either FortiExplorer or an Internet browser. For more information about connecting to the GUI, see the QuickStart Guide for you FortiGate model.
• Log in using an admin account. The default admin account has the username admin and no password.
Configuring interfaces
• To edit the Internet-facing interface (in the example, wan1), go to Network > Interfaces.
• Set the Estimated Bandwidth for the interface based on your Internet connection.
• Set Role to WAN.
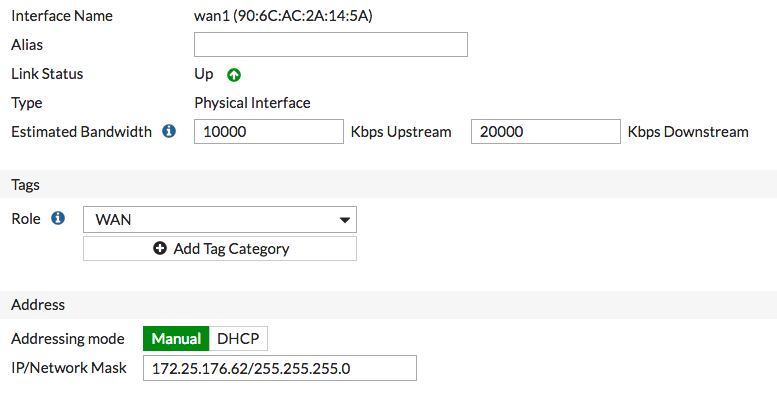
• To determine which Addressing mode to use, check if your ISP provides an IP address for you to use or if the ISP equipment uses DHCP to assign IP addresses.
– If your ISP provides an IP address, set Addressing mode to Manual and set the IP/Network Mask to that IP address.
– If your ISP equipment uses DHCP, set Addressing mode to DHCP to allow the equipment to assign an IP address to WAN1.
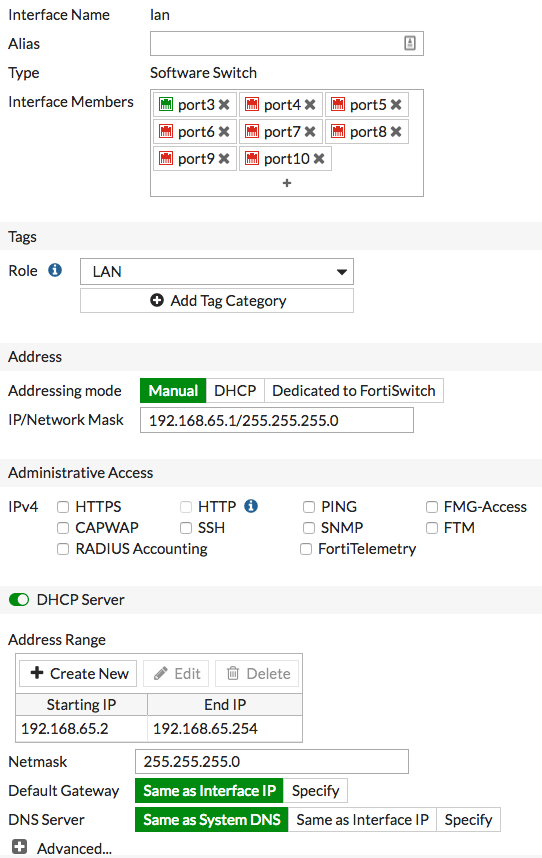
• Edit the LAN interface, which is called Internal on some FortiGate models.
(Oh, by the way #2: If your FortiGate doesn’t have a default LAN interface, for this step, you can use either an individual interface or create a software switch to combine the separate interfaces into a single virtual interface.)
• Set Role to LAN.
• Set Addressing mode to Manual and set the IP/Network Mask to the private IP address that you want to use for the FortiGate.
• If you need to assign IP addresses to devices on your internal network, enable DHCP Server.
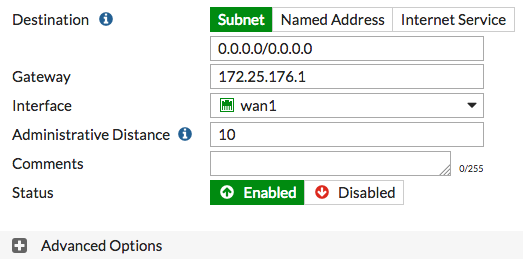
Adding a default route
• To create a new default route, go to Network > Static Routes. Typically, you have only one default route. If the static route list already contains a default route, you can edit it, or delete the route and add a new one.
• Set Destination to Subnet and leave the destination IP address set to 0.0.0.0/0.0.0.0.
• Set Gateway to the IP address provided by your ISP and Interface to the Internet-facing interface.
Selecting DNS servers (optional)
The FortiGate DNS settings are configured to use FortiGuard DNS servers by default, which is sufficient for most networks. If you need to change the DNS servers, go to Network > DNS, select Specify, and add Primary and Secondary servers.

Creating a policy
(Oh, by the way #3: Some FortiGate models include an IPv4 security policy in the default configuration. If you have one of these models, edit it to include the logging options shown below, then proceed to the results section.)
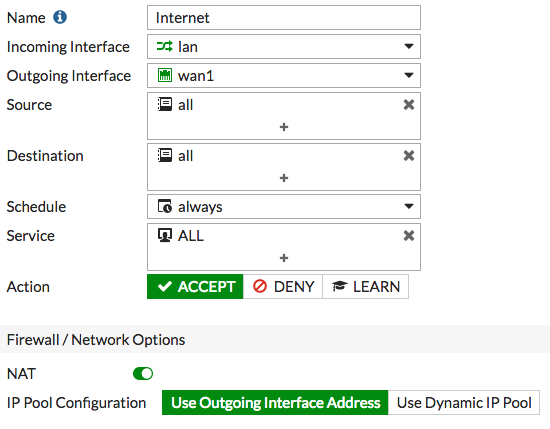
• To create a new policy, go to Policy & Objects > IPv4 Policy.
• Give the policy a Name that indicates that the policy will be for traffic to the Internet (in the example, Internet).
• Set the Incoming Interface to lan and the Outgoing Interface to wan1. Set Source, Destination Address, Schedule, and Services as required.
• Ensure the Action is set to ACCEPT.
• Turn on NAT and select Use Outgoing Interface Address.
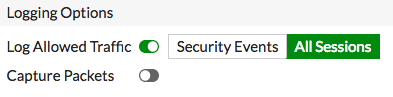
• Scroll down to view the Logging Options. To view the results later, enable Log Allowed Traffic and select All Sessions.
Results
• Browse the Internet using the PC on the internal network.
• If you can’t connect to the Internet, see FortiGate installation troubleshooting.
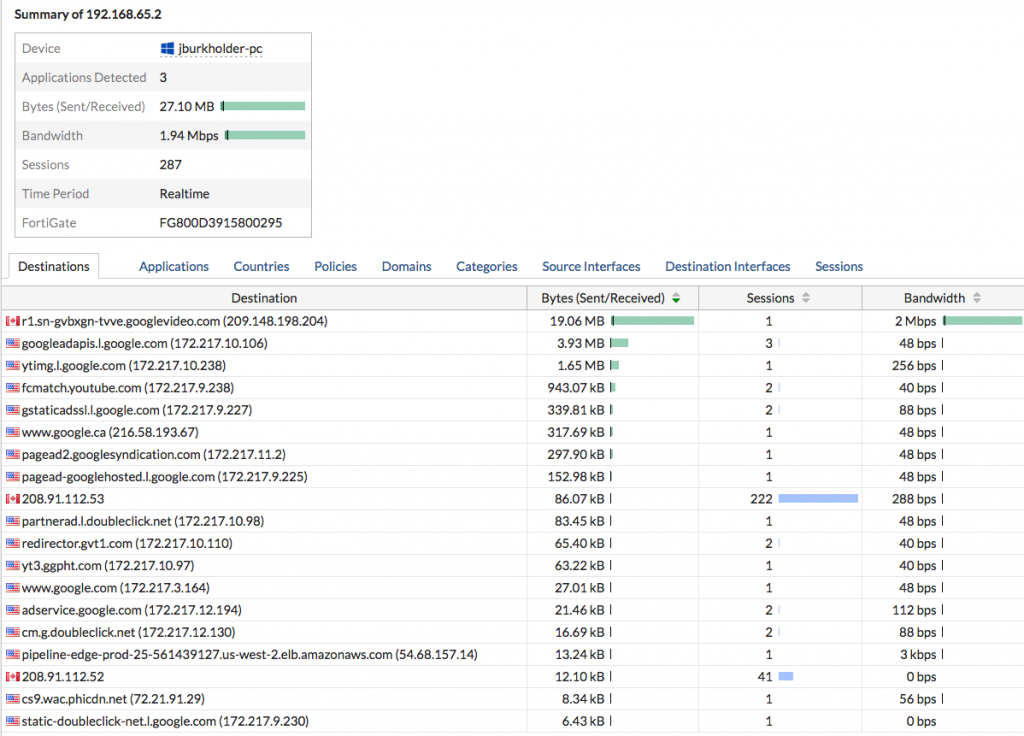
• To view information about FortiGate traffic, go to FortiView > Traffic from LAN/DMZ > Sources. The PC appears on the list of sources.

• To view more detailed information about the traffic from the PC, right-click the entry for the PC and select Drill Down to Details.
• If your FortiGate model has internal storage and disk logging enabled, a drop-down menu in the top corner allows you to view historical logging information for the previous 5 minutes, 1 hour, and 24 hours.
• If you’re not sure whether your model supports disk logging, download the FortiGate Feature/Platform Matrix here.
And, for further stimulating reading, you can check out NAT mode installation here.
So that should be just enough to get you into real trouble, so we’ll call it a day. If you have ANY questions about this or anything else Fortinet related, we would love to hear from you, so just email us or call Corporate Armor at 877-449-0458. And thanks for reading!